LLM API를 이용해 원하는 기능을 만들고 사용해보고 싶지만 항상 비용이 걱정됩니다.
비용 문제도 해결하고 직접 학습도 할 수 있는 매력적인 Local LLM(LLaMa3)과 함께 LangChain의 주요 내용들을 알아보겠습니다.

LangChain
ChatGPT를 필두로 한 LLM은 굉장히 유용한 툴입니다.
하지만, 아직은 사용자가 수많은 정보들을 정확하게 입력해줘야 원하는 결과를 얻을 수 있습니다.
context와 입출력 format을 더 자세히 제공할 수록 더 빠르게 구체적이고 좋은 결과를 줍니다.
또한, 얻은 결과는 사람들이 직접 가공하여 사용하여야 합니다.
여기서 LangChain이라는 툴이 유용하게 사용될 수 있습니다. LLM이 뇌라면 LangChain은 LLM의 손, 발, 눈, 코, 입이 되어줍니다.
Local LLM 실행 (w.Ollama)
LangChain 사용에 앞서 로컬에서도 LLM을 사용할 수 있는 방법을 알아보겠습니다.
Ollama

LLM을 로컬에서 실행할 수 있도록 도와주는 툴입니다. cli 툴로 개발자들에게 특히 유용하게 사용될 수 있는 툴입니다.
- Ollama에 등록된 LLM을 로컬에 pull 받습니다.
ollama pull llama3
- Ollama를 실행합니다.
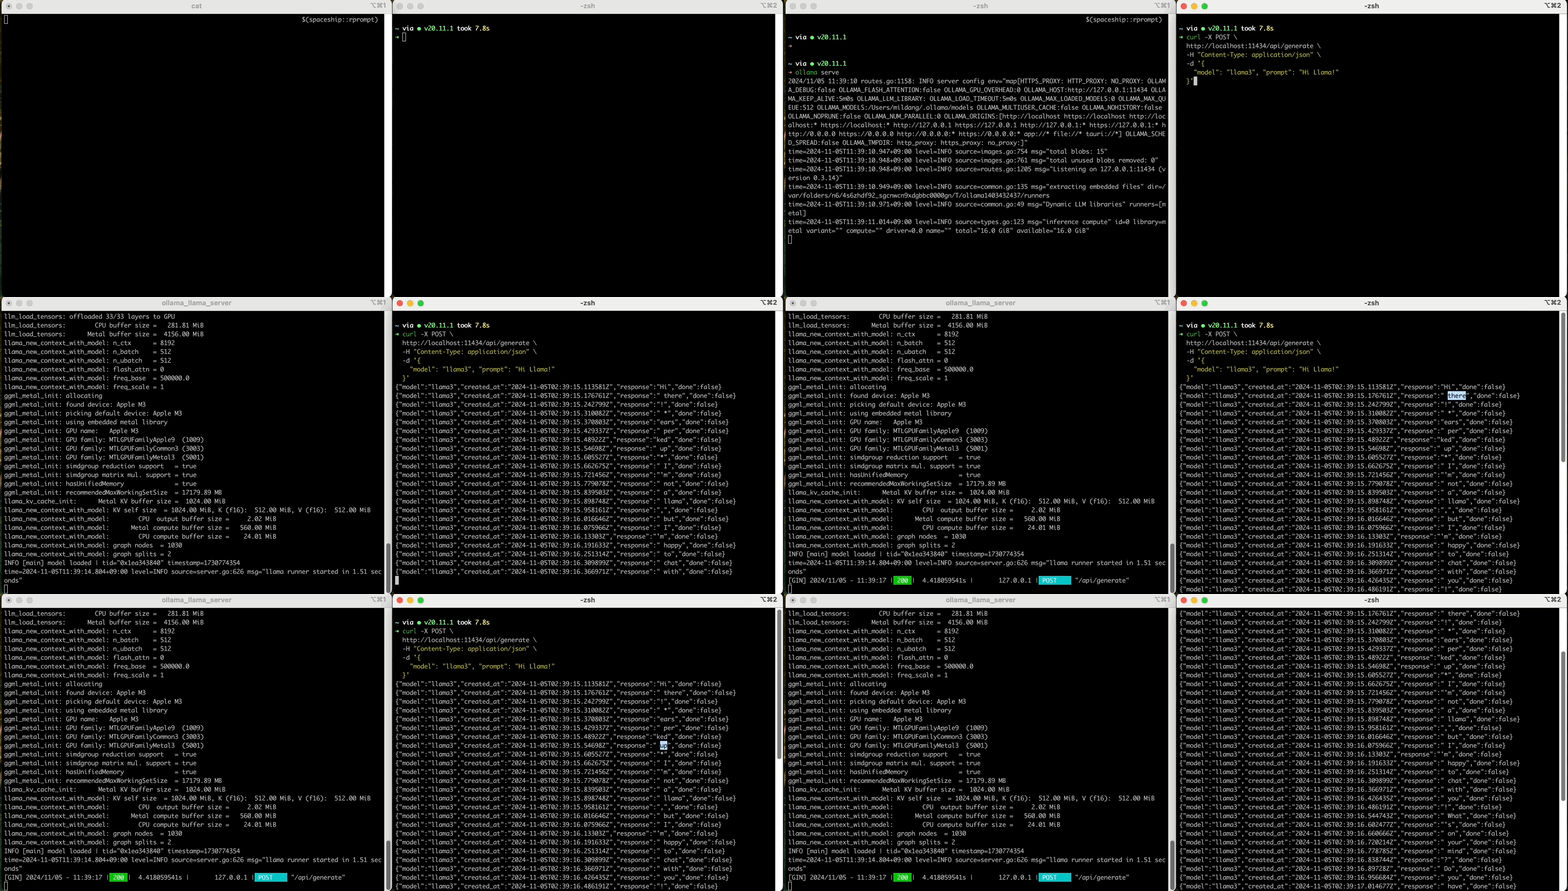
default로 http://127.0.0.1:11434에 ollama와 통신할 수 있는 API가 열립니다.
ollama serve
- curl로 ollama와 통신, LLM과 대화
open된 ollama 서버에 요청을 보내고, 결과를 받습니다.
요청시 ollama가 가지고 있는 LLM model을 지정해줘야 합니다.
curl http://localhost:11434/api/generate -d '{
   "model": "llama3",
   "prompt": "Hello LLaMA!"
}'

- 혹은 langchain_ollama를 활용해 통신, LLM과 대화
curl이외에 LangChain에서 제공하는 ollama 통신 모듈을 활용해 통신할 수도 있습니다.
# Python
from langchain_ollama.llms import OllamaLLM

# Ollama 통신 객체 생성 및 초기화
llm = OllamaLLM(model="llama3")

# prompt와 함께 Ollama의 LLM과 통신
prompt = "Hello LLaMA!"
response = llm.invoke(prompt)
# 결과 출력
print(f'{response=}')
Template & Parser
기본적으로 LLM의 입력과 출력은 Text 혹은 Image와 같이 컴퓨터가 온전히 이해할 수 있는 형태의 정보들을 받거나 출력할 수 있습니다.
쉽게 말하자면, Python의 Dictionary나 Array같은 프로그래밍 언어 만의 자료구조 형태로는 입력과 출력을 할 수 없다는 뜻입니다.
따라서, LLM이 이해할 수 있는 형태로 입력을 변환하여 주고, LLM이 출력한 결과를 다시 활용하기 좋은 형태로 변환해주는 작업이 필요합니다.
LangChain에선 입력은 Prompt Template, 출력은 Output parser의 형태로 이를 제공합니다.
(현 포스팅에선 Text 형태의 LLM 입,출력만 다룹니다.)
Prompt Template
LLM 입력으로 제공할 prompt Template를 만들 수 있습니다.
특히, 입력 설명, 출력 format 설정 및 설명, 역할 설정 그리고 출력 예시들(shots)과 같이 개별 대화마다 필요한 설명들(System Prompt)처럼 반복되는 부분을 템플릿화하여 사용할 수 있습니다.
from langchain_community.llms import Ollama
from langchain_core.prompts import PromptTemplate

prompt_template = PromptTemplate.from_template("""
You are a software assistant, especially dealt with python and TypeScript(+ node.js).
Answer the following questions with the best of your knowledge and explanation in readable format like indented bullet points with clean codes.

{question}
""")
# prompt 완성
prompt = prompt_template.invoke({ "question": "What is the difference between Python and TypeScript?" })

# LLM에 prompt 전달
llm = Ollama(model="llama3")
llm.invoke(prompt)
print(f'{response=}')
LangChain에는 PromptTemplate이외에도 ChatPromptTemplate, FewShotPromptTemplate 등이 다양한 prompt template이 있습니다.
목적에 맞게 사용해주시면 됩니다.
Output parser
LLM의 출력을 런타임에서도 다루기 쉬운 형태로 변환해주는 작업이 필요합니다.
이번 포스팅에선 PydanticOutputParser를 사용해보겠습니다.
# string 형태의 LLM 출력을 파싱하기 위한 OutputParser
from langchain_core.output_parsers import PydanticOutputParser

class Joke(BaseModel):
    setup: str = Field(description="The setup to the joke")
    punchline: str = Field(description="The punchline to the joke")

parser = PydanticOutputParser(pydantic_object=Joke)

template = "Answer the user query.\n{format_instructions}\n{query}"
system_message_prompt = SystemMessagePromptTemplate.from_template(template)
chat_prompt = ChatPromptTemplate.from_messages([system_message_prompt])

prompt = chat_prompt.invoke({
    "query": "What is a really funny joke about Python programming?",
    "format_instructions": parser.get_format_instructions()
})
print(f'{prompt=}')
프롬프트가 아래와 같이 준비됩니다.
Answer the user query.
The output should be formatted as a JSON instance that conforms to the JSON schema below.

As an example, for the schema {"properties": {"foo": {"title": "Foo", "description": "a list of strings", "type": "array", "items": {"type": "string"}}}, "required": ["foo"]}
the object {"foo": ["bar", "baz"]} is a well-formatted instance of the schema. The object {"properties": {"foo": ["bar", "baz"]}} is not well-formatted.

Here is the output schema:
\`\`\`
{"properties": {"setup": {"description": "The setup to the joke", "title": "Setup", "type": "string"}, "punchline": {"description": "The punchline to the joke", "title": "Punchline", "type": "string"}}, "required": ["setup", "punchline"]}
\`\`\`
What is a really funny joke about Python programming?
프롬프트를 LLM에 전달하고, 결과를 파싱합니다.
result = llm.invoke(prompt)
print(f'{result=}')

try:
    joke_object = parser.parse(result)
    print(joke_object.setup)
    print(joke_object.punchline)
except Exception as e:
    print(e)
LLM이 준 결과가 아래와같이 나옵니다.
Here's the output:

\`\`\`json
{
    "properties": {
      "setup": {
        "description": "The setup to the joke",
      "title": "Setup",
      "type": "string"
    },
    "punchline": {
        "description": "The punchline to the joke",
      "title": "Punchline",
      "type": "string"
    }
  },
  "required": ["setup", "punchline"],
  "setup": "Why do programmers prefer dark mode so much?",
  "punchline": "Because light attracts bugs."
}
\`\`\`
아래와같이 파싱되어 나옵니다.
print(joke_object.setup)
print(joke_object.punchline)

# Why do programmers prefer dark mode so much?
# Because light attracts bugs.
LCEL(LangChain Expression Language)
프롬프트, 모델, 출력 파서 등의 구성 요소를 파이프 연산자( | )를 사용해서 단일 체인으로 구성하는 LangChain에서 지원하는 표현 방식입니다.
연속적인 함수 실행엔 메소드 체이닝 방법도 있지만, 그보다 훨씬 가독성이 좋은 방법이라고 할 수 있습니다.
주의할 점으로 LCEL 파이프라인 시작시 랭체인에서 제공하는 함수 중, 파이프라인에 사용할 수 있는 함수를 사용해 시작해야합니다.
from langchain_core.runnables import RunnableLambda

# 단일 파이프라인, + 1 -> * 2 순서로 실행
sequence = RunnableLambda(lambda x: x + 1) | (lambda x: x * 2)
print(sequence.invoke(1)) # 4

# 병렬 파이프라인, + 1 -> * 2, * 5 순서로 실행
sequence2 = RunnableLambda(lambda x: x + 1) | {
  'mul_2': RunnableLambda(lambda x: x * 2),
  'mul_5': RunnableLambda(lambda x: x * 5)
}
res = sequence2.invoke(1) # { 'mul_2': 4, 'mul_5': 10 }

# 파이프라인끼리 연결
sequence3 = sequence2 | RunnableLambda(lambda x: x['mul_2'] + x['mul_5'])
res = sequence3.invoke(1) # 14
prompt 생성부터 출력까지의 과정을 LCEL로 표현해보겠습니다.
LCEL scope
LCEL 파이프라인 구현시 주의해야할 점은 파이프라인 바로 전 단계의 출력의 결과만을 사용할 수 있다는 것 입니다.
대표적으로 itemgetter 함수와 RunnablePassthrough가 있습니다.
from langchain_core.runnables import RunnableLambda, RunnablePassthrough
from operator import itemgetter

def prompt_lambda(prompt: str) -> str: # Fake LLM for the example
    return {"prompt": prompt, "with_system_prompt": f'Answer the user query. query : {prompt}'}

chain = RunnableLambda(prompt_lambda) | {
    # RunnablePassthrough는 앞 pipeline의 output을 그대로 받을 수 있다.
    'original': RunnablePassthrough(), # Original LLM output
    'system_prompt': itemgetter('with_system_prompt') # 'Answer the user query. query : {prompt}'
} | RunnablePassthrough()

res = chain.invoke("What is the difference between Python and TypeScript?")
print(f'{res=}')
# RunnablePassthrough는 바로 앞 pipeline의 output을 그대로 받아 출력한다.
# res=
# { 'original': {
#     'prompt': 'What is the difference between Python and TypeScript?',
#     'with_system_prompt': 'Answer the user query. query : What is the difference between Python and TypeScript?'
#   },
#   'system_prompt': 'Answer the user query.\nWhat is the difference between Python and TypeScript?'
# }
LCEL with LLM
LLM과 함께 파이프라인을 구현해보겠습니다.
prompt1 = ChatPromptTemplate.from_template("what is the city {person} is from?")
prompt2 = ChatPromptTemplate.from_template(
    "what country is the city {city} in? respond in {language}"
)

model = OllamaLLM(model="llama3.1")

# LLM에서 받은 응답을 Parser로 변환해줘야 pipeline에서 사용할 수 있다.
chain1 = prompt1 | model | StrOutputParser()

chain2 = (
    # chain2 내부에 chain1을 이었다. 일종의 chain depth
    {"city": chain1, "language": itemgetter("language")}
    | prompt2
    | model
    | StrOutputParser()
)

res = chain2.invoke({"person": "obama", "language": "korean"})
print(f'{res=}')
# res=
# 오바마(Barrack Obama) 대통령의 생모지국은? 그것은 하와이(Hawaii)입니다.
# 그는 1961년 8월 4일 Honolulu, Hawaii에서 Kapi'olani Medical Center for Women and Children에서 태어났습니다.
# 하지만 그의 고향 또는 성장한 곳은 일리노이주 시카고(Cicago, Illinois)입니다! 오바마는 대부분의 인생을 시카고에서 보냈으며, 그는 하와이 생모지국보다 시카고에 더 많은 친감을 느꼈습니다.
etc…
그 외 RemoteRunnable, RunnableParallel 등등… LCEL 파이프라인에서 사용가능한 다양한 Runnable이 있습니다.