SSE(Server-Sent events) with EventSource
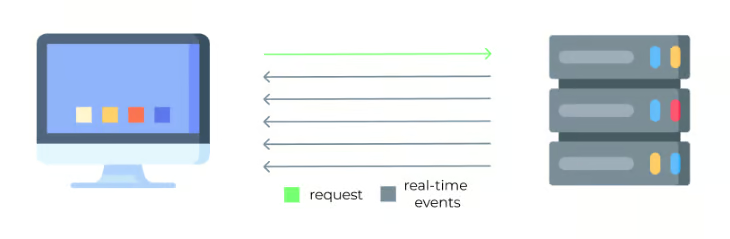
보통 HTTP 통신은 요청 1번에 응답 1번을 받습니다.
하지만 SSE(Server-Sent events) 한번의 연결로 여러번의 응답을 실시간으로 받을 수 있습니다.
이번 글에선 EventSource Web API를 활용해 SSE를 이용하는 방법을 알아보겠습니다.
SSE(Server-Sent events)란?
SSE(Server-Sent events)는 HTTP 기반으로, 서버의 데이터를 실시간으로 streaming하는 기술입니다.
실시간 통신의 대명사인 webSocket과 다른 점은 서버에서 클라이언트로의 단방향 스트리밍이라는 점입니다.
ref. SSE의 HTTP spec
polling과 webSocket
SSE이외에 지속 통신 방법은 두가지가 있습니다. polling과 webSocket입니다.
vs polling
poling은 client가 직접 일정 주기로 요청해서 서버 data를 pull하는 방식으로 주기적인 HTTP 통신 요청을 해줘야 하기 때문에 리소스가 낭비됩니다.
반면, SSE는 한번의 요청 및 연결 성립으로 실시간 통신이 가능합니다.
vs webSocket
webSocket은 SSE와는 다르게 양방향 통신이 가능하고, 한번의 연결로 여러번의 요청과 응답이 가능합니다. (정확히는, webSocket은 연결후에도 계속 handshake를 주고받습니다.)
하지만, webSocket만의 protocol이 따로 있으며, 양방향 통신이 반드시 필요한 경우가 아니라면, SSE를 사용하는 것이 더 간단하고 효율적입니다.
또한, webSocket은 fireWall에 의한 통신 issue가 있을 수 있는 반면, SSE는 그렇지 않습니다.
Open connection 제한과 HTTP/2
EventSource - mdn 문서에선 SSE를 사용하기 전에, 브라우저의 연결 제한을 확인하라고 합니다.
크롬 및 파이어폭스 브라우저는 “한 브라우저 + domain” 당 open connection을 최대 6개까지만 유지할 수 있도록 제한하고 있습니다.
즉, SSE를 연결하는 동일한 주소의 페이지가 있을 경우 6개 탭까지만 연결되고 그 이후엔 추가적인 연결이 제한된다는 것입니다.
하지만, HTTP/2를 사용하면, default 100개까지 open connection을 유지할 수 있습니다.
EventSource
EventSource는 SSE 연결을 편리하게 할 수 있도록 해주는 Web API입니다.
클라이언트에서 SSE를 연결을 위해 여러가지를 알아보면 바로 나오는 것이 MDN에서 소개하는 Using_server-sent_events입니다.
EventSource로 서버와 SSE 연결을 하는 방법을 알려줍니다.
EventSource의 특징
EventSource API는 고유한 특징과 한계가 있습니다.
사용할 때, 이러한 특징과 한계를 고려해야 합니다!
- GET 요청입니다.
- 연결이 끊기면 자동으로 다시 연결합니다.
- withCredentials 옵션을 통해 CORS 정책을 준수할 수 있습니다.
- SSE 연결 요청시, header를 수정할 수 없습니다. 🤯 (Setting headers for EventSource discussion에 의하면 앞으로도 header 수정 기능을 추가할 생각은 없는 것 같습니다. 😇)
SSE example
간단한 예시와 함께 SSE를 사용하는 방법을 알아보겠습니다. (feat. EventSource)
Server
express.js로 예시 서버를 만들어 봤습니다.
SSE 연결을 위해 줘야하는 응답은 간단합니다.
res.setHeader("Content-Type", "text/event-stream");
res.setHeader("Cache-Control", "no-cache");
res.setHeader("Connection", "keep-alive");
res.flushHeaders();
이렇게 header를 달아 응답을 주면, client와 event stream 연결이 성립됩니다.
이 후, 같은 API에서 원하는 데이터와 함께 응답을 보내면 실시간으로 client에 전송이 됩니다.
// send server sent events
let counter = 0;
const interValID = setInterval(() => {
  counter++;
  if (counter > 5) {
    clearInterval(interValID);
    // if connection is closed, retry after 10s
    res.write("retry: 10000\n");
    res.end();
    return;
  }

  ///// real-time sent data /////
  res.write(`id: ${counter}\n`);
  res.write(`data: ${JSON.stringify({ num: counter })}\n\n`);
  ///////////////////////////////

}, 1000);

// If client closes connection, stop sending events
res.on("close", () => {
  console.log("client dropped me");
  clearInterval(interValID);
  res.end();
});
Client
EventSource를 통해 서버와 SSE 연결을 맺고, 실시간으로 전송되는 이벤트를 listen하는 코드입니다.
let closeTime = 0;
const sseDataElement = document.getElementById('sse');
const eventSource = new EventSource(`https://localhost:3000/slack/sse`, {
  withCredentials: true,
});

eventSource.addEventListener('message', (event) => {
  sseDataElement.innerHTML += event.data + '<br>';
});

eventSource.addEventListener('open', (event) => {
  const openTime = Date.now().getTime();
  console.log('open sse connection', openTime);
  if (closeTime > 0) console.log('reopen At : ', closeTime - openTime);
});

// we can use custom event!
eventSource.addEventListener('custom', (event) => {
  console.log('custom event', event);
});

eventSource.onerror = (error) => {
  console.error('SSE Error:', error);
  closeTime = Date.now().getTime();
  console.log('close sse connection At : ', closeTime);
};
Demo
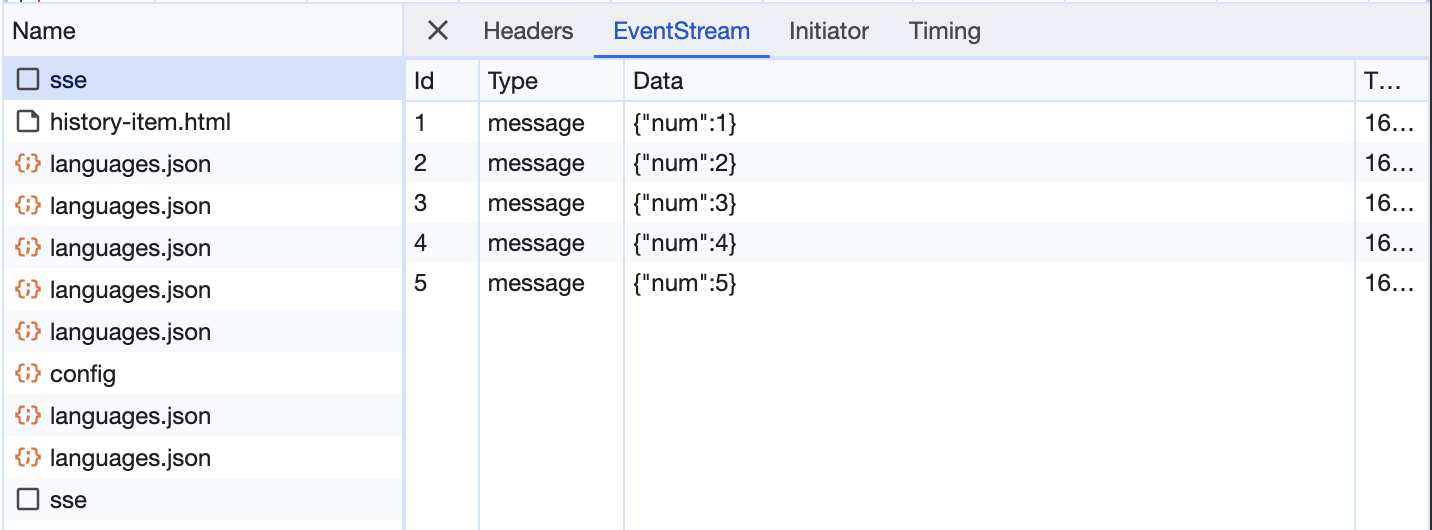
사실 EventSource 문서만 봐선 어떻게 사용해야할지 명확하게 알기 힘들어, 간단한 예시로 직접 해봤습니다.
network 탭을 보면, 한번의 요청으로 여러번의 응답을 받는 것을 확인할 수 있습니다.
retry
서버에서 ms과 함께 retry 메세지를 전달하면, 연결이 끊겼을 때 재요청하는 시간을 조정할 수 있습니다.
// retry in 1s
res.write("retry: 1000\n");
이번엔 3초로 설정해보겠습니다.
// retry in 3s
res.write("retry: 3000\n");

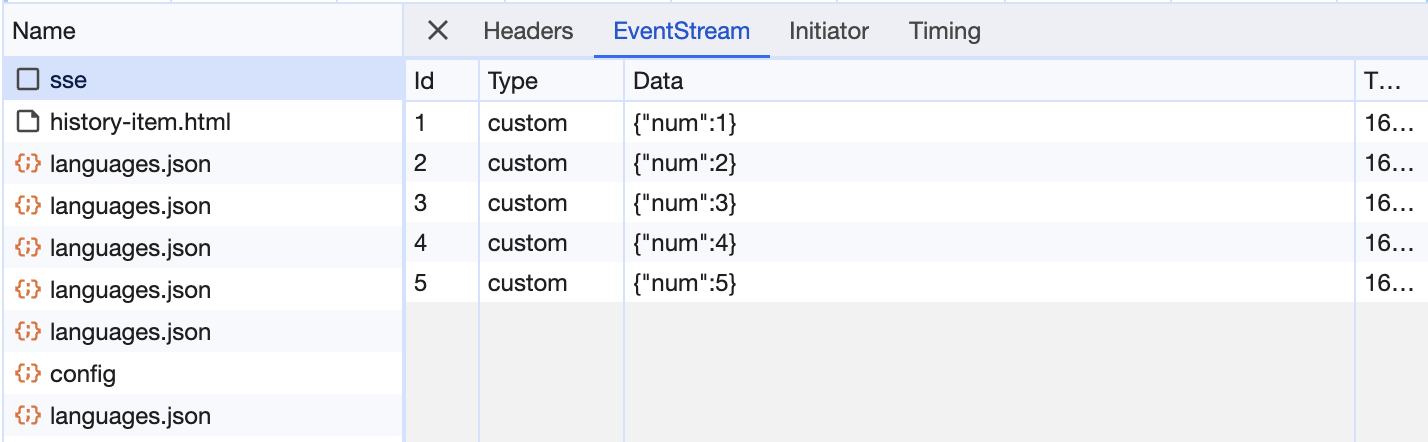
Custom Event
default인 message event 외에도 직접 추가한 custom event를 사용할 수 있습니다.
event가 명시돼있지 않는 경우는 모두 message event입니다.
///// real-time sent data /////
res.write("event: custom\n");
res.write(`id: ${counter}\n`);
res.write(`data: ${JSON.stringify({ num: counter })}\n\n`);
///////////////////////////////

network 탭에서 event type이 custom으로 바뀐 것을 확인할 수 있습니다.
EventSource의 한계와 polyfills
Web API로 주어지는 EventSource는 편리하지만, GET 요청 밖에 안되는 점, header 수정이 안되는 점 등의 한계가 있습니다.
polyfill 라이브러리를 통해 이 한계를 극복할 수 있습니다.
혹은, ReadableStream 혹은 xhr.onprogress로 직접 구현할 수도 있습니다. 👍
아래 코드는 fetch와 ReadableStream을 활용한 SSE 구현 예시입니다. ref
const fetchSSE = () => {
    fetch(url, {
      method: 'POST',
      headers: {
        token: authToken,
        'Content-Type': 'application/json; charset=utf-8',
      },
      body: {
         // ...
      },
     })
      .then((response) => {
        const reader = response.body!.getReader();
        const decoder = new TextDecoder();

        const readChunk = () => {
          return reader.read().then(appendChunks);
        };

        const appendChunks = (result) => {
          const chunk = decoder.decode(result.value || new Uint8Array(), {
            stream: !result.done,
          });
          const parseData = JSON.parse(chunk);
          // do something with parseData

          if (!result.done) {
            return readChunk();
          }
        };

        return readChunk();
      })
      .then(() => {
        // when it's done
      })
      .catch((e) => {
        // error
      });
};
Conclusion
SSE의 개념과 EventSource를 통해 실시간 통신을 하는 방법을 알아보았습니다.
EventSource API가 모든 것을 해결해주기 보단 이를 보완한 여러 해결책들이 많은 것으로 보아 앞으로도 여러가지 해결할 문제들이 많을 것 같아 관심있게 지켜보고 해결해야할 문제가 있다면 적극적으로 해결해보려고 합니다. 😁
Ref.
https://developer.mozilla.org/en-US/docs/Web/API/EventSource
https://blog.logrocket.com/using-fetch-event-source-server-sent-events-react/
https://kwseo.github.io/2017/03/25/sse/
https://surviveasdev.tistory.com/entry/%EC%9B%B9%EC%86%8C%EC%BC%93-%EA%B3%BC-SSEServer-Sent-Event-%EC%B0%A8%EC%9D%B4%EC%A0%90-%EC%95%8C%EC%95%84%EB%B3%B4%EA%B3%A0-%EC%82%AC%EC%9A%A9%ED%95%B4%EB%B3%B4%EA%B8%B0