Decorator는 아직 정식으로 추가된 JS의 feture가 아닙니다.
그럼에도 사람들에게 널리 유용하게 쓰이는 기능입니다! 연구도 활발히 진행되고 있구요!
대체 뭐길래? 그럴까요?
Decorator의 사용
보통 babel이나 TypeScript를 통해 사용되고 있습니다.
TypeScript config중에 “experimentalDecorators” 를 true로 해주면 사용이 가능하죠.
Decorator란?
ES7 스펙 명세에는 Decorator를 아래와 같이 설명하고 있습니다.
선언된 클래스와 그 프로퍼티들을 디자인 시간에 변경할 수 있는 편리한 문법
그럼 어떤 기능인지 한 번 살펴보시죠!
Decorator를 왜, 어디에 사용하나요?
Decorator는 일종의 wrapper처럼 활용 될 수 있습니다! Util함수 처럼 여기저기서 많이 활용되어야 하는 함수에 적합하죠!
클래스의 프로퍼티를 읽기 전용으로 만든다던지 열거 대상에서 제외할 수 있습니다.
Decorator의 활용은 여기서 끝나지 않습니다. 메모이제이션을 하는 메서드를 만들수 있고 클래스에 자동으로 바인드된 메서드로 만들 수도 있습니다.
React에선 무려 HOC처럼 활용할 수도 있죠…!!
Descriptor(설명자)
Decorator를 이해하기 전에 Descriptor(설명자)에 대해 알아야 하지만 이것은 ref로 붙여놓고 Decorator 자체에 좀 더 집중해보겠습니다!
https://wonism.github.io/what-is-decorator/
https://kelly-kh-woo.medium.com/javascript-decorator-descriptor-fd7e982a64ee
https://ui.toast.com/weekly-pick/ko_20200102
MetaProgramming
Decorator를 알아보는데 갑자기 뜬금없이 웬 MetaProgramming인가 싶을 것입니다.
눈치 채셨겠지만, Decorator와 같은 프로그래밍 방법이 MetaProgramming이기 때문입니다.
그래서 개념을 한 번 알아보고 넘어가겠습니다!
“Metaprogramming” is a programming technique in which computer programs have the ability to treat other programs as their data. It means that a program can be designed to read, generate, analyze, or transform other programs, and even modify itself while running.
너무 기네요;;; 아찔하군요 😵 😵
정리하자면 한 프로그램이 다른 프로그램을 읽고 만들고 분석하고 수정할 수 있도록 하는 프로그래밍 테크닉 이며,
다른 프로그램에 영향을 주는 프로그램을 “MetaProgram”이라하고
이런 Program을 만들어 사용하는 것을 “MetaProgramming”이라고 합니다.
넓은 의미로는, 런타임에 수행해야 할 작업의 일부를 컴파일 타임 동안 수행하는 프로그램을 말하기도 한다고 하네요. (ref. wiki백과)
Decorator는 두가지 개념들이 모두 해당됩니다.
MetaLanguage
Decorator와는 관계없는 내용이지만, 추가해보았습니다.
완전히 다른 언어로 된 프로그램을 조작하는 프로그램 언어를 “MetaLanguage”라고 합니다.
TypeScript는 JavaScript로 된 프로그램을 만들어내기에 일종의 “MetaLanguage”이며,
Java도 bytecode로 된 프로그램을 만들어내기 때문에 일종의 “MetaLanguage”라고 할 수 있습니다.
반대로 같은 언어로 된 프로그램을 조작하는 프로그램 언어를 “homoiconic language”라고 합니다.(“Lisp”가 여기에 해당하고 희귀하다고 합니다.)
ref
https://medium.com/jspoint/a-brief-introduction-to-metaprogramming-in-javascript-88d13ed407b5
https://ko.wikipedia.org/wiki/메타프로그래밍
Decorator
데코레이터는 “데코레이터 함수”(또는 메서드)의 약자입니다.
데코레이터의 모체는 함수라는 이야기이죠~!
그리고 새 함수를 반환하여 전달 된 함수 또는 메서드의 동작을 수정하는 함수입니다.
함수를 1급 시민으로서의 기능을 지원하는 모든 언어는 데코레이터를 구현할 수 있다고 합니다.
파이썬이나 자바에서도 Decorator 기능이 있지요.
그럼 우린 TypeScript와 JavaScript의 Decorator기능을 알아봅시다.
아래의 예시는 Person class에 Logger라는 function을 Decorator로 사용한 예시입니다.
function Logger(constructor: Function) {
	console.log("Loggeing.....");
	console.log(constructor);
}

// Logger function을 사용한 Decorator
@Logger
class Person {
	name = "Jun";

	constructor() {
		console.log("Creating Person Object...");
	}
}

const pers = new Person();
console.log(pers);
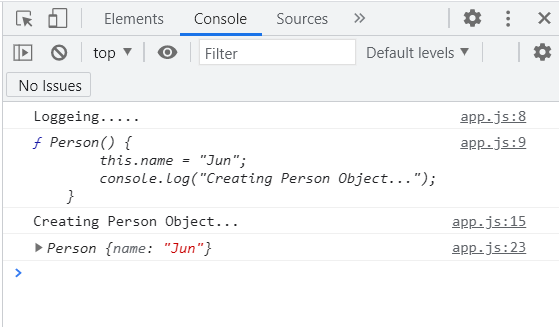
console의 결과를 보셨듯, 기존 Person class대로라면 “Creating Person Object…“와 Person instance만 출력되어야 했으나,
그 위에 Logger function의 내용이 추가 되었습니다.
Decorator의 정의대로 Person class에 Logger function의 코드가 추가 되어 함께 작동하고 있는 것을 확인 할 수 있습니다.
Decorator Factory
기존의 Decorator function를 한번 감싸서 다른 데이터를 받아들인 뒤 Decorate해줄 수도 있습니다.
이 Decorator function을 감싸는 함수를 “Decorator Factory”라고 합니다.
이렇게 함으로써, Decorator function 외부의 다른 정보를 받아올 수 있게 되었습니다!
아래의 코드는 위의 코드를 Decorator Factory형태로 개조한 것입니다.
function Logger(logString: string) {
	// Decorator function을 return한다.
  return function(constructor: Function) {
    console.log(logString);
    console.log(constructor);
  };
}

// Decorator function을 한번 감쌋으므로 실행해야한다.
@Logger("Logging - Person")
class Person {
  name = "Max";

  constructor() {
    console.log("Creating person object...");
  }
}

const pers = new Person();
console.log(pers);
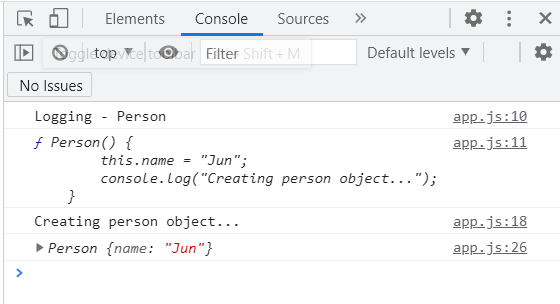
console 맨 윗줄에 Decorator Factory의 parameter가 출력된 것을 확인 할 수 있습니다!
Decorator의 실행 순서
Decorator는 일반 프로그래밍과 비교하면 실행 순서도 다르고 그 특성도 다르고, 언뜻 봐서는 뭐가 어떻게 실행되는 건지 알 수 없습니다.
따라서 헷갈릴 수 있는 Decorator의 실행 순서를 한 번 짚고 넘어가 보겠습니다!
Instance화 되기 전에 실행 된다.
가장 중요한 Decorator의 특성은 Decorator가 걸린 function 혹은 class가 instance화 될 때, 실행 되는 것이 아닌 선언 되었을 때 실행 된다는 것입니다.
즉, JS가 class 혹은 function의 정의를 읽을 때, 실행된다는 것입니다.
// constructor는 class를 본따 만든 객체 원형이 들어가 있다. (Prototype 개념 참고)
function Logger(constructor: Function) {
	console.log("Loggeing.....");
	console.log(constructor);
}

@Logger
class Person {
	name = "Jun";

	constructor() {
		console.log("Creating Person Object.....");
	}
}

// 여기서 멈춤!
debugger;
const pers = new Person();
debugger;
console.log(pers);
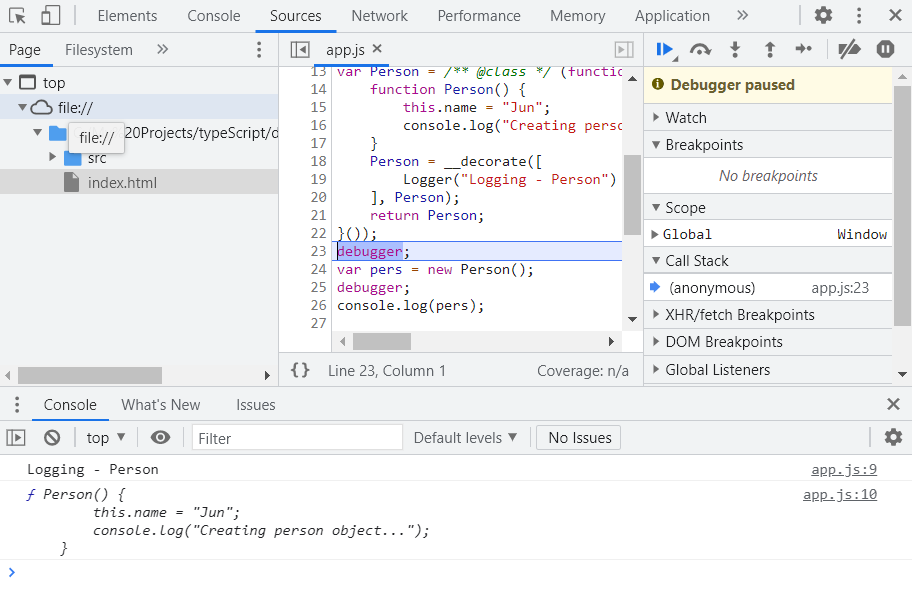
위에서 확인 할 수 있듯이 instance화 되기 전에 Decorator가 먼저 실행됩니다.
Decorator가 여러개인 경우
위에서부터 @1, @2가 있다고 가정했을 때, 실행순서는 아래와 같습니다.
@1 Factory function → @2 Factory function → @2 Decorator function → @1 Decorator function
즉, Factory는 평상시처럼 위에서 아래로, Decorator는 아래서 위로 적용됩니다.
아래와 같은 코드가 있다고 했을때, 실행하면 다음과 같은 결과가 나옵니다.
function Logger(logString: string) {
  console.log("Logger Factory");
  return function(constructor: Function) {
    console.log(logString);
    console.log(constructor);
  };
}

function WithTemplate(template: string, hookId: string) {
  console.log("Template Factory");
  return function(constructor: any) {
    console.log("!!Rendering Template");
    const hookEl = document.getElementById(hookId)!;
    const p = new constructor();
    if (hookEl) {
      hookEl.innerHTML = template;
      hookEl.querySelector("h1")!.textContent = p.name;
    }
  }
}

// @1 = Logger, @2 = WithTemplate
@Logger("Logging - Person")
@WithTemplate("<h2>Rendered!!</h2><h1></h1>", "root")
class Person {
  name = "Jun";

  constructor() {
    console.log("Creating person object...");
  }
}

// 여기서 멈춤!
debugger;
const pers = new Person();
debugger;
console.log(pers);

위에서 나열된 순서대로 실행되었습니다!
여러 형태의 Decorator
class나 function 그 자체에 붙이는 것 이외에도 아래와 같은 곳에도 가능합니다.
- property
- parameter
- accessor
- method
나열하고 보니 생각할 수 있는 거의 모든 곳에 사용할 수 있네요…!
실행 순서는 class Decorator와 같이 instance화 되기 전에 미리 실행이 됩니다.
사용시, 주의해야 할 점은!
어디에 Decorator를 붙여주냐에 따라 Decorator function에서 받는 parameter들이 조금씩 다릅니다.
아래는 적용 예시입니다.
// property Decorator
function Log(target: any, propertyName: string | Symbol) {
  console.log('Property decorator!');
  console.log(target, propertyName);
}

// accessor Decorator
function Log2(target: any, name: string, descriptor: PropertyDescriptor) {
  console.log('Accessor decorator!');
  console.log(target);
  console.log(name);
  console.log(descriptor);
}

// method Decorator
function Log3(
  target: any,
  name: string | Symbol,
  descriptor: PropertyDescriptor
) {
  console.log('Method decorator!');
  console.log(target);
  console.log(name);
  console.log(descriptor);
}

// parameter Decorator
function Log4(target: any, name: string | Symbol, position: number) {
  console.log('Parameter decorator!');
  console.log(target);
  console.log(name);
  console.log(position);
}

class Product {
	// property Decorator
  @Log
  title: string;
  private _price: number;

	// accessor Decorator
  @Log2
  set price(val: number) {
    if (val > 0) {
      this._price = val;
    } else {
      throw new Error('Invalid price - should be positive!');
    }
  }

  constructor(t: string, p: number) {
    this.title = t;
    this._price = p;
  }

	// method, parameter Decorator
  @Log3
  getPriceWithTax(@Log4 tax: number) {
    return this._price * (1 + tax);
  }
}

const p1 = new Product('Book', 19);
const p2 = new Product('Book 2', 29);
Decorator로 기존의 logic을 수정
지금까지는 Decorator의 logic을 추가하는 것만 확인해보았습니다.
Decorator function에 return을 주지 않고 있죠…!
하지만 이번엔 Decorator로 기존 logic을 수정해보도록 하겠습니다…!
위에서 사용했던 로직을 재활용하여 아래 함수를 읽기 전용으로 바꾸어 보겠습니다.
function Log3(
  target: any,
  name: string | Symbol,
  descriptor: PropertyDescriptor
) {
  console.log('Method decorator!');
  console.log(target);
  console.log(name);
  console.log(descriptor);
	// 이 Decorator function이 적용된 것은 readonly가 됩니다.
	return ({
		writable: false
	});
}

class Product {
  title: string;
  private _price: number;

  @Log3
  getPriceWithTax(@Log4 tax: number) {
    return this._price * (1 + tax);
  }
}

const p1 = new Product('Book', 19);
// p1.getPriceWithTax = "sdsd"; X error