Redux
React Project가 커지다보면 state도 매우 방대해지고 그렇게 되면 관리하기 매우 까다로워지는데 이것을 해결해주는 third-party library가 “Redux”이다.
routine이 synchronous하다는게 특징이다.(middleware를 통해 async logic을 넣을 수 있다.)
언제 Redux가 필요할까?
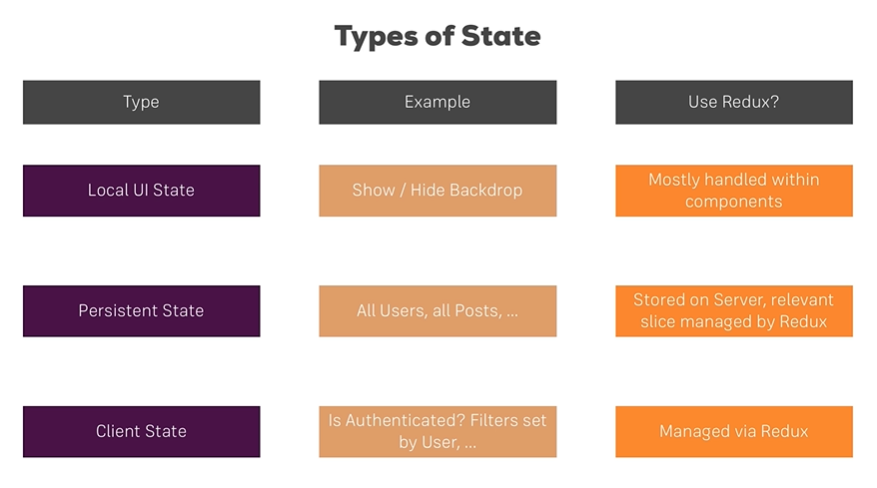
단순 toggle은 component state로 가능하고 정적인 Data는 DB에 담으면 된다.
하지만!
유저가 인증되었는지, 등급은 무었인지 등의 service 이용중에 언제든 필요한 정보를 관리할때는 Redux가 매우 유용하다.
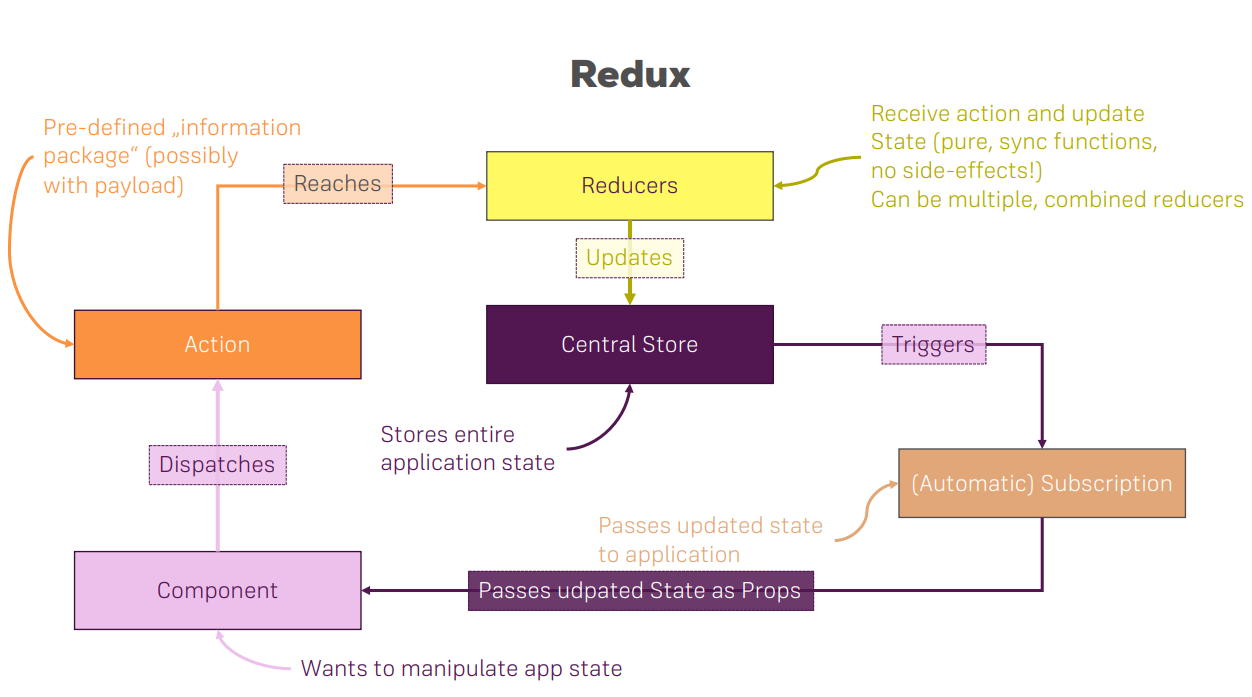
Redux 구성요소들
크게 4가지로 나뉜다.
react에
- Store
- Reducer
- Dispaching Action
- Subscribe
/*
    발동 순서
    Action -> Reducer -> Store -> Subscribe
*/
const redux = require('redux');
const createStore = redux.createStore;

const initialState = {
    counter: 0
}

// Reducer
const rootReducer = (state = initialState, action) => {
    //Dispatching action에서 붙인 type 이름으로 action을 구분
    if (action.type === 'INC_COUNTER') {
        return {
            ...state,
            counter: state.counter + 1
        };
    }
    if (action.type === 'ADD_COUNTER') {
        return {
            ...state,
            counter: state.counter + action.value
        };
    }
    return state;
};

// Store
const store = createStore(rootReducer);
console.log(store.getState());

// Subscription
store.subscribe(() => {
    console.log('[Subscription]', store.getState());
});

// Dispatching Action
store.dispatch({type: 'INC_COUNTER'});
store.dispatch({type: 'ADD_COUNTER', value: 10});
console.log(store.getState());
밑에부턴 react와 연계하여 설명
Store와 React 연결
react-redux라는 library를 통해 redux와 react를 연결한다.
//index.js
import React from 'react';
import ReactDOM from 'react-dom';
import { createStore, combineReducers } from 'redux';
import reducer from './store/reducer';
import { Provider } from 'react-redux';

import counterReducer from './store/reducers/counter';
import resultReducer from './store/reducers/result';

import './index.css';
import App from './App';
import registerServiceWorker from './registerServiceWorker';

//여기서 나눠진 reducer를 하나로 묶는다.(하나의 global state로 통합된다.)
const rootReducer = combineReducers({
    ctr: counterReducer,
    res: resultReducer
})

//param에는 사용할 reducer를 넣어준다.
const store = createStore(rootReducer);

//Provider는 store를 react app에 주입시켜주는 역할
ReactDOM.render(<Provider store={store}><App /></Provider>, document.getElementById('root'));
registerServiceWorker();
Reducer
하나로 둘 수도 있지만 여러개를 둘 수도 있다. 하지만 결국엔 하나의 reducer로 통합하여 사용해야한다.
//reducer.js
//통합버전
import * as actionTypes from './actions';

const initialState = {
    counter: 0,
    results: []
}

const reducer = (state = initialState, action) => {
    //주의!!!! state는 반드시 imuutably update해야한다.
    switch (action.type){
        case actionTypes.INCREMENT:
            // state 갱신 방법 1
            const newState = Object.assign({}, state);
            newState.counter = state.counter + 1;
            return newState
        case actionTypes.DECREMENT:
            // state 갱신 방법 2
            //...state로 내용물을 새로운 object에 모두 복사하고
            //counter라는 새로운 property를 추가하는데 state안에 같은 property가 있다면 override
            return {
                ...state,
                counter: state.counter - 1
            }
        case actionTypes.ADD:
            return {
                ...state,
                //val은 내가 지은 이름
                counter: state.counter + action.val
            }
        case actionTypes.SUBRTRACT:
            return {
                ...state,
                //payload는 내가 붙인 이름
                counter: state.counter - action.payload
            }
        case actionTypes.STORE_RESULT:
            return {
                ...state,
                results: state.results.concat({id: new Date().getMilliseconds(), value: state.counter})
            }
        case actionTypes.DELETE_RESULT:
            //const newArray = [...state.results]
            //newArray.splice(id,1);
            const updatedArray = state.results.filter((el) => el.id !== action.resultElId);
            return {
                ...state,
                results: updatedArray
            }
    }

    return state;
};

export default reducer;
2개로 쪼갠다면 이렇게 된다.
//counter.js
import * as actionTypes from '../actions';

const initialState = {
    counter: 0
}

const reducer = (state = initialState, action) => {
    //주의!!!! state는 반드시 imuutably update해야한다.
    switch (action.type){
        case actionTypes.INCREMENT:
            // state 갱신 방법 1
            const newState = Object.assign({}, state);
            newState.counter = state.counter + 1;
            return newState
        case actionTypes.DECREMENT:
            // state 갱신 방법 2
            //...state로 내용물을 새로운 object에 모두 복사하고
            //counter라는 새로운 property를 추가하는데 state안에 같은 property가 있다면 override
            return {
                ...state,
                counter: state.counter - 1
            }
        case actionTypes.ADD:
            return {
                ...state,
                //val은 내가 지은 이름
                counter: state.counter + action.val
            }
        case actionTypes.SUBRTRACT:
            return {
                ...state,
                //payload는 내가 붙인 이름
                counter: state.counter - action.payload
            }
    }

    return state;
};

export default reducer;
//result.js
import * as actionTypes from '../actions';

const initialState = {
    results: []
}

const reducer = (state = initialState, action) => {
    //주의!!!! state는 반드시 imuutably update해야한다.
    switch (action.type){
        case actionTypes.STORE_RESULT:
            return {
                ...state,
                //기존의 state.counter는 없고, split reducer에선 global state에 접근할 수 없으니 action으로 값을 받아 저장한다.
                results: state.results.concat({id: new Date().getMilliseconds(), value: action.val})
            }
        case actionTypes.DELETE_RESULT:
            //const newArray = [...state.results]
            //newArray.splice(id,1);
            const updatedArray = state.results.filter((el) => el.id !== action.resultElId);
            return {
                ...state,
                results: updatedArray
            }
    }

    return state;
};

export default reducer;
Action과 Subscribe
일반 Component에 추가 및 등록해 사용한다.
import React, { Component } from 'react';
//connect를 통해 일반 component에 Action과 Subscribe를 할 수 있도록 해준다.
import { connect } from 'react-redux';

import CounterControl from '../../components/CounterControl/CounterControl';
import CounterOutput from '../../components/CounterOutput/CounterOutput';

import * as actionTypes from '../../store/actions';

class Counter extends Component {
    render () {
        return (
            <div>
                {/*redux를 통해 가져온 state정보를 custom props에 저장한 것을 사용*/}
                <CounterOutput value={this.props.ctr} />
                <CounterControl label="Increment" clicked={this.props.onIncrementCounter} />
                <CounterControl label="Decrement" clicked={this.props.onDecrementCounter}  />
                <CounterControl label="Add 5" clicked={this.props.onAddCounter}  />
                <CounterControl label="Subtract 5" clicked={this.props.onSubTractCounter}  />
                <div>
                    <button onClick={() => this.props.onStoreResult(this.props.ctr)}>StoreResult</button>
                    <ul>
                        {this.props.storedResults.map(el => {
                            return (<li key={el.id} onClick={() => this.props.onDeleteResult(el.id)}>{el.value}</li>)
                        })}
                    </ul>
                </div>
            </div>
        );
    }

}

//Subscribe
//이걸로 state에서 원하는 정보를 골라 props에 저장하도록 한다.
const mapStateToProps = state => {
    //param으로 받는 state는 redux를 통해 central store에서 가져온 정보이다.
    return {
        //ctr은 props이름
        //ctr: state.counter,
        ///storedResults: state.results
        //index.js에서 각 reducer에게 붙여준 이름을 사용한다.
        ctr: state.ctr.counter,
        storedResults: state.res.results
    };
}

//Action
//원하는 동작을 저장한다.
//type으로 저장한 이름을 reducer의 action.type에서 판단한다.(동작은 판단 후 그곳에서 logic작성)
//Convention : type이름은 대문자로
const mapDispatchToProps = dispatch => {
    return {
        //넘겨주는 value 변수의 이름은 자유이다. (action.{내가지은변수명})로 받을 수 있다.
        onIncrementCounter: () => dispatch({type: actionTypes.INCREMENT}),
        onDecrementCounter: () => dispatch({type: actionTypes.DECREMENT}),
        onAddCounter: () => dispatch({type: actionTypes.ADD, val: 10}),
        onSubTractCounter: () => dispatch({type: actionTypes.SUBRTRACT, payload: 15}),
        onStoreResult: (val) => dispatch({type: actionTypes.STORE_RESULT, val: val}),
        onDeleteResult: (id) => dispatch({type: actionTypes.DELETE_RESULT, resultElId: id})
    }
}

//connect function은 hoc function을 return 한다.
//connect의 param에 (어떤 state를 원하는지, 어떤 dispatch 동작을 할껀지 설정해준다.)
export default connect(mapStateToProps, mapDispatchToProps)(Counter);
MiddleWare
express.js의 middleware처럼 action의 process중간에 끼어들어 Reducer에 도달하기 전까지 action과 함께 같이 실행되는 것으로 async한 처리도 가능하다.(Redux는 기본적으로 모든 process가 sync하다)
logging같은 도중에 처리가 필요한 것에 유용하다.
특히 async처리를 원한다면 필수적이다.
redux-thunk
확장 library로 async 처리를 위해 필수적이다.
redux-thunk는 아래와 같이 설정한다.
//index.js
import thunk from 'redux-thunk';
import { applyMiddleware } from 'redux';

//composeEnhancers는 Redux 디버깅 툴(선택사항)
const store = createStore(rootReducer, composeEnhancers(applyMiddleware(thunk)));
Action Creator
기존에 Action을 dispatch하던 곳에 다른 Logic이 끼어들어 함께 실행되는 하나의 묶음을 Action Creator라고 한다.
//이것이 기존의 Action creator
export const saveResult = (res) => {
    return {
        type: STORE_RESULT,
        result: res
    }
}

export const storeResult = ( res ) => {
    //thunk가 middleware로 침투했기 때문에 function을 받아 실행해준다.
    //param은 dispatch로 얘를 통해 최종적인 action을 dispatch한다.(즉, dispatch가 되기 전에 logic을 끼워넣는 것.)
    //getState로 global state에 접근 가능
    return (dispatch, getState) => {
        setTimeout( () => {
            dispatch(saveResult(res));
        }, 2000 );
    }
};