React
React는 Javascript library로 vanila JS보다 좀 더 readable, reusable 하고 간편하게 UI를 handle할 수 있다.
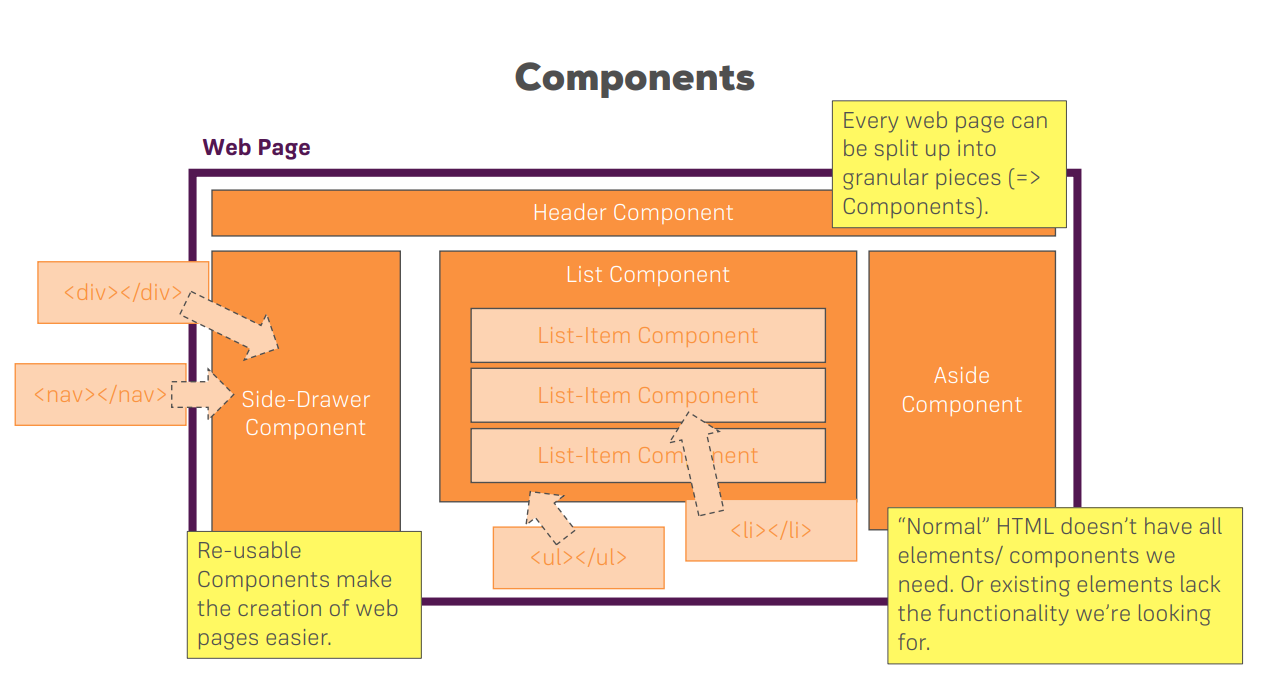
가장 큰 특징은 componenet를 하나씩 붙여 완성시키는 형태이다.
SPA(single page app)
refresh DOM
props와 state가 변하면 DOM을 refresh한다.
오로지 저 두개만이 trigger이다.
stateless vs stateful components
최소한의 stateful component로 business logic을 표현하고
잘게 쪼갠 stateless functional component(단순 출력)에 logic의 결과를 뿌려 표현하면 managable한 react app이 된다.
JSX
React의 synthetic sugar로 HTML같은 markup 형태의 코드를 사용할 수 있다.
import React, { Component } from 'react';
import logo from './logo.svg';
import './App.css';
//component class의 유일한 method render()
//react는 반드시!!! rendering 가능한 html 코드를 반환해야한다.
class App extends Component {
  render() {
    //두 return은 모두 같은 결과
    //JSX형태의 코드는 아래와 같은 함수 형태로 compile되어 DOM에 적용된다.
    return (
        //TEXT가 아닌것에 주목!!!
      <div className="App">
        <h1>Hi, I'm a React App</h1>
      </div>
    );
    //return React.createElement('div', null, React.createElement('h1','Hi, I\'m a React App'));
  }
}

export default App;
ref : https://velog.io/@jellyloveschoco/React-JSX%EB%9E%80
Restrictions
JSX는 Javascript XML로 결국 HTML이 아니라 Javascript의 확장판이다. 따라서 사용에 몇가지 주의사항이 있다.
- class -> className
js에선 class선언에 class 문구를 사용하므로 class를 사용할 수 없다.
- neighbor tag를 사용할 수 없다.
JSX의 가장 parent와 동등한 level의 또 다른 tag를 사용할 수 없다.
자식들은 몇개라도 상관 없다.
components & props
components는 react app의 core building block으로 매우 중요하다.
components
각 component는 JSX code를 return / render 해야한다.
component 생성엔 2가지 방법이 있다.
- Functional components
aka. “presentational”, “dumb” or “stateless” components
const cmp = () => { return <div>some JSX</div> }
- class-based components
aka. “containers”, “smart” or “stateful” components
class Cmp extends Component { render () { return <div>some JSX</div> } }
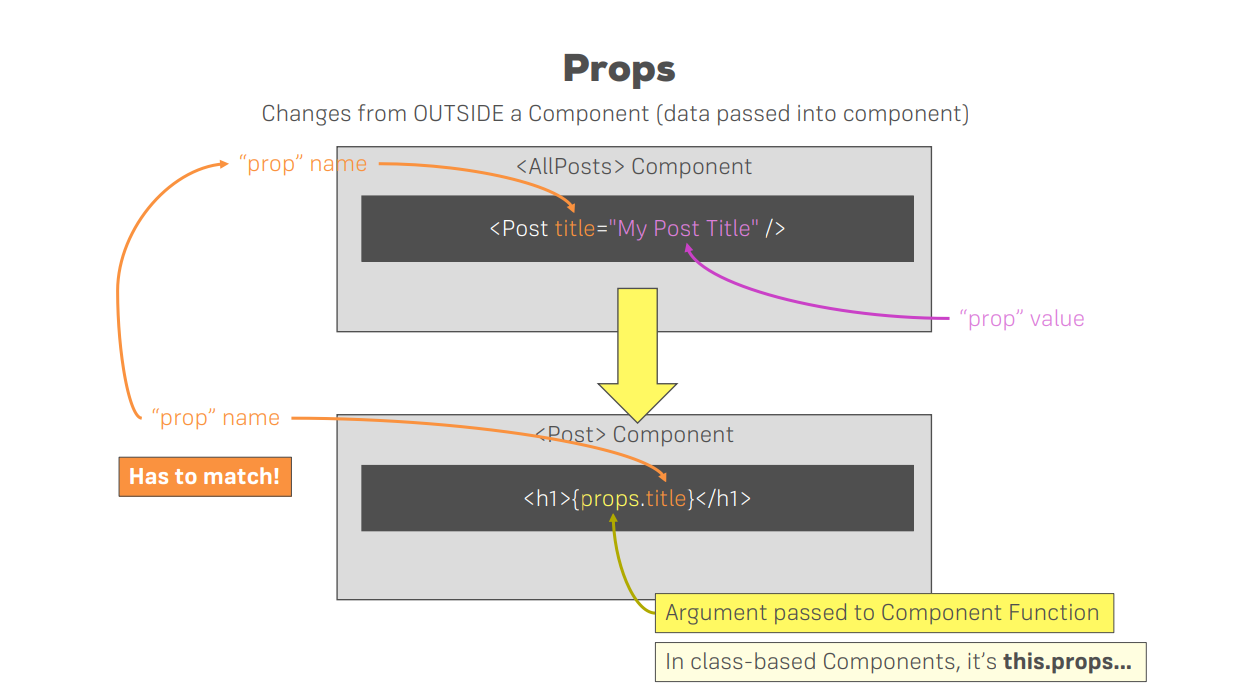
props
불러온 component에 parameter를 보낼 때 props에 모든 parameter를 property로 붙여 보내주게 된다.
//Person.js
import React from "react";

const person = ( props ) => {
    //1. js를 JSX안에서 동작시키거나 적용하고 싶으면 {}를 해주면 된다.
    //2.name과 age에 붙여 보낸 data를 이렇게 적용한다.
    //3. prop.children은 <Person>의 자식들을 모두 불러온다.
    return (
        <div>
            <p>I'm a Person name : {props.name}, age : {props:age}!</p>;
            <p>random Num : {Math.floor(Math.random() * 30)}</p>
            <p>{props.children}</p>
        </div>
    );
};

export default person;
//App.js
import React, { Component } from 'react';
import logo from './logo.svg';
import './App.css';
import Person from './person/person.js';

class App extends Component {
  render() {
    return (
        //Person이라는 custom component를 불러와 붙였다.
        //"My hobbie : LOL"은 Person의 자식이므로 props.children에 붙는다.
      <div className="App">
        <h1>Hi, I'm a React App</h1>
        <Person name="woo" age="30" />
        <Person name="Lee" age="40" >My hobbie : LOL</Person>
        <Person name="K" age="23" />
      </div>
    );
  }
}

export default App;
component가 class형태일때는?
“this.props”를 사용하면 된다.
//person.js
class Person extends Component{
    render(){
        return <p>My name is {this.props.name}</p>;
    }
}
state
React.js에서 유동적인 데이터를 사용할 때 state라는 것을 사용. (컴포넌트 내에 별도의 상태가 필요할 때)
this.setState()를 통해 state를 갱신한다.
주어진 데이터와 원래 데이터를 비교해 바뀐 부분만 갱신하고 re-rendering한다.
import React, { Component } from 'react';
import logo from './logo.svg';
import './App.css';
import Person from './person/person.js';

class App extends Component {
    //처음 초기화한 state를 변경하면 react가 감지해 re-rendering한다
    state = {
        persons: [
            {name: "woo", age: "30"},
            {name: "Lee", age: "40"},
            {name: "K", age: "23"}
        ],
        //persons만 갱신했으므로 얘는 그대로 있는다.
        otherState: "some other value"
    };

    //Naming convention : ~~~Handler는 eventHandler를 뜻한다.
    switchNameHandler = () => {
      //console.log('Was clicked!!');

      //DON'T DO THIS : this.state.persons[0].name = "Kim"
      //setState()를 통하지 않고 바꾸면 react가 인식을 못해 re-rendering이 되지 않는다.

      //바뀐 부분만 갱신하고 re-rendering한다
      this.setState({
          persons: [
            {name: "kim", age: "445"},
            {name: "park", age: "123"},
            {name: "A", age: "7865"}
          ]
      })
    };

  render() {
      //JSX가 HTML이 아니라는 증거('C'에 주목!)
      //HTML: onclick="methodName"
      //JSX: onClick={methodName}
    return (
      <div className="App">
        <h1>Hi, I'm a React App</h1>
        <button onClick={this.switchNameHandler}>Switch Name</button>
        <Person name={this.state.persons[0].name} age={this.state.persons[0].name} />
        <Person name={this.state.persons[1].name} age={this.state.persons[1].age} >My hobbie : LOL</Person>
        <Person name={this.state.persons[2].name} age={this.state.persons[2].age} />
      </div>
    );
  }
}

export default App;
ref : https://medium.com/@yeon22/react-js-react-js%EC%9D%98-state-%EC%82%AC%EC%9A%A9%EB%B0%A9%EB%B2%95-fb47327e685b
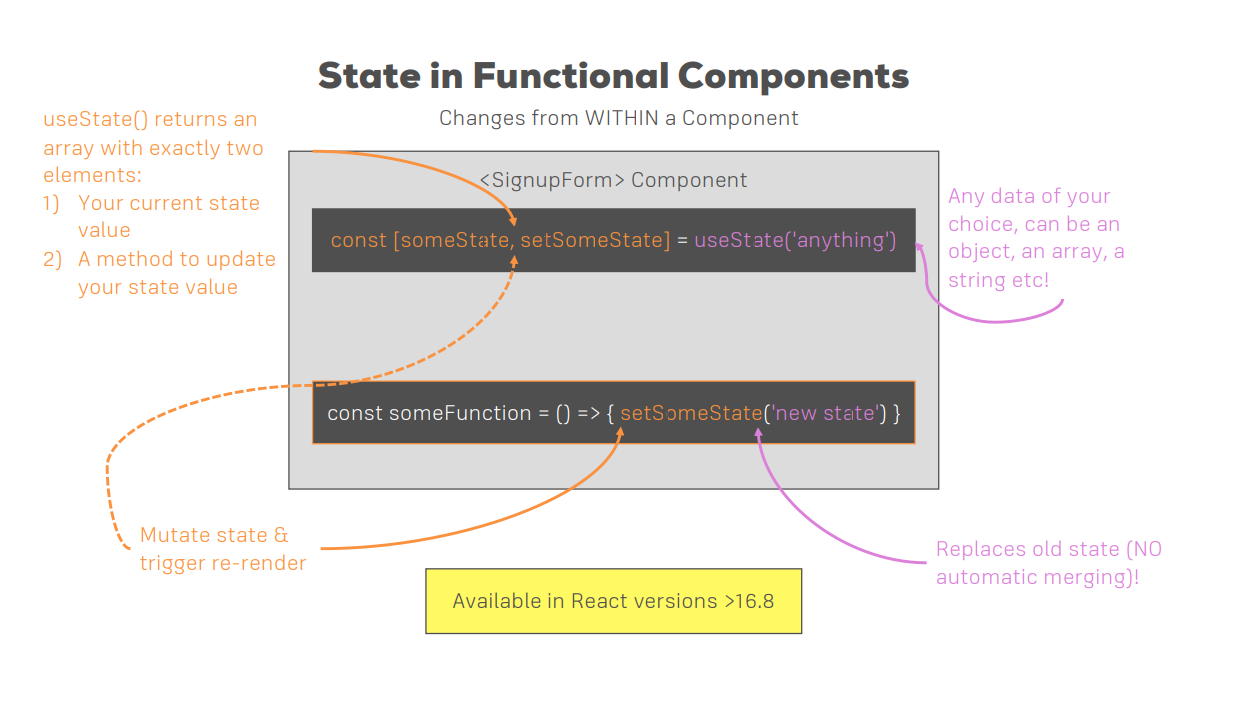
state hook
v.16.8 이후 class component에 state property를 붙여 사용하던 기존 방식에 추가 된 기능으로
functional component 안에 state property를 붙여 사용할 수 있게 되었다.
하지만 class based에 비해 사용법과 특성들에 차이점이 있다.
import React, { useState } from 'react';
import logo from './logo.svg';
import './App.css';
import Person from './person/person.js';

const App = (props) => {
    //param으로 init한다.
    //currentState = state초기값, function that allow us to update state = state를 update할 수 있는 function
    //출력 Arr: (currentState, functionForTheUpdateState)
    const [ personsState, setPersons ] = useState({
        persons: [
            {name: "woo", age: "30"},
            {name: "Lee", age: "40"},
            {name: "K", age: "23"}
        ],
        otherState: "some other value"
    });

    //!!!!class state와의 중요한 차이점!
    /*
        class : 달라진것만 덮어쓰고 끝
        function : 달라지면 전부 덮어쓴다. = otherState가 없어짐
        (해결책으로 useState를 한번 더 불러 아예 별개의 state를 만든다.)
    */
    console.log(personsState);

    //별개의 state와 해당 state를 갱신할 function이 만들어 졌다.
    const [otherState, setOhterState] = useState('some other value');

    switchNameHandler = () => {
      //더이상 class가 아니므로 this.setState가 치환된다.
      setPersons({
          persons: [
            {name: "kim", age: "445"},
            {name: "park", age: "123"},
            {name: "A", age: "7865"}
          ]
      })
    };

    //this.state -> personsState (function의 this는 windowObject)
    return (
      <div className="App">
        <h1>Hi, I'm a React App</h1>
        <button onClick={switchNameHandler}>Switch Name</button>
        <Person name={personsState.persons[0].name} age={personsState.persons[0].name} />
        <Person name={personsState.persons[1].name} age={personsState.persons[1].age} >My hobbie : LOL</Person>
        <Person name={personsState.persons[2].name} age={personsState.persons[2].age} />
      </div>
    );
}

export default App;
Passing method & binding
일반 var 뿐만 아니라 method도 넘길 수 있고 해당 method에 param을 달아 보내는 방법도 여러가지이다.
거꾸로 입력받은 것을 받아와 state를 update하는 것도 가능하다.
//Person.js
import React from "react";
const person = ( props ) => {
    //1. click으로 정해진 값으로 변환
    //2. input의 입력한 값으로 화면의 값 변환
    return (
        <div>
            <p onclick={props.click}>I'm a Person name : {props.name}, age : {props:age}!</p>;
            <p>{props.children}</p>
            <input type="text" onChange={props.changed}>
        </div>
    );
};
export default person;
//App.js
class App extends Component {
    state = {
        persons: [
            {name: "woo", age: "30"},
            {name: "Lee", age: "40"},
            {name: "K", age: "23"}
        ],
        otherState: "some other value"
    };

    switchNameHandler = (newName) => {
      this.setState({
          persons: [
            {name: newName, age: "445"},
            {name: "dd", age: "123"},
            {name: "A", age: "7865"}
          ]
      })
    };

    //input 이라는 event의 value를 받아 state를 갱신한다.
    nameChangeHandler = (event) => {
        this.setState({
          persons: [
            {name: "woo", age: "445"},
            {name: event.target.value, age: "123"},
            {name: "A", age: "7865"}
          ]
        })
    };

  render() {
      //2가지 pram을 붙여 보내는 방법
      //1. .bind사용(call은 즉시 실행이라 ㄴㄴ)
      //2. 익명함수를 씌우고 Handler에 param을 넣어 보내주는 방법
    return (
      <div className="App">
        <h1>Hi, I'm a React App</h1>
        <button onClick={this.switchNameHandler}>Switch Name</button>
        <Person
            name={this.state.persons[0].name}
            age={this.state.persons[0].name}
            click={() => this.switchNameHandler('Arthur')}
        ></Person>
        <Person
            name={this.state.persons[1].name}
            age={this.state.persons[1].age}
            click={this.switchNameHandler.bind(this, "Kim")}>My hobbie : LOL</Person>
        <Person
            name={this.state.persons[2].name}
            age={this.state.persons[2].age}
            changed={this.nameChangeHandler}
            />
      </div>
    );
  }
}

export default App;
style 적용
간단하게 2가지의 방법이 있다.
- 외부의 css를 import
css를 import하면 webpack이 알아서 html에 적용해준다.
- inline styles
JSX안에 style을 직접 설정해준다.
render(){
    const style = {
        backgroundColor: 'white',
        font: 'inherit',
        border: '1px solid blue',
        padding: '8px',
        cursor: 'pointer'
    }

    return (
        <div style={style}>
        </div>
    )
}


